
If you are using DigitalOcean as your hosting provider, then you might know that it quite hard to setup and configure your email server on your droplet. Also, it is poorly reputed because it conflicts with many other services and very hard to manage. You might know this if you have read it about on DigitalOcean guides.
Apart from these facts, there are several other issues like Firewall, Emails treated as spam, Antivirus false detection and much more. For that reason, we have seen that the beginners are not that attracted by DigitalOcean.
Read: Why You May Not Want To Run Your Mail Server?
Contents
Why Choose Digital Ocean?
But to be honest, DigitalOcean is the best hosting service that I came across in the past four years. You can customize anything in any way you want from memory limit to PHP version to operating system. With unlimited bandwidth and enormous processing power, it can handle almost anything that you throw at it.
Let me explain this with an example. One of my friends was doing event blogging, and he purchases $5/month droplet. And luckily when he got lots of traffic approx 10000+ real time visitors, he was worried about the server. You can optimize your WordPress PageSpeed score to get even more speed. But server handled that much of traffic effectively.
So, you can see there is no chance for any other hosting provider to beat its competitive price. But now back to the custom email problem.
But what if I say that there is a way around this without setting up anything on DO?
You will be thinking about Gmail for business.
What if I say it is absolutely free?
Pretty intriguing right! So here in this article, we are going to see how you can add custom emails with your DigitalOcean droplet using free email service.
How to Setup Free Custom Email On DigitalOcean
So let me reveal the service that I have entertained a lot. Its name is Zoho. You probably may have heard about this, but what you don’t know is that it provides free custom email for single domain per account and up to a total of 10 custom emails.
Getting excited huh? So let’s get on with how to setup Zoho email with your DO server.
Signing Up with Zoho
- The very first thing that you will need to do is to sign up with Zoho. For this go to zoho.com and sign up using your details and complete the verification process.

- Now login to your Zoho account.
- After logging in you will see various Zoho services. Click on Mail option.
- Now you will be redirected to plans page. There select Lite plan. You will get 5 GB of storage per email account with ad-free experience. Make sure to choose to add your existing domain option.
- After selecting the free plan, it will ask you to add your domain to Zoho. Enter your domain name and proceed.


Verifying the Domain Name & Setting up Custom Email
- Now you will have to verify whether you own the domain or not. There are various options to verify the domain but to keep it neat and straightforward we will use Cname method.
- Login to your Digital Ocean account and go to networking tab. From there select your domain and click on more and then click manage domain to access the DNS Manager.
- Now click on CName and enter the Zoho records to verify the domain.
- Click on proceed verification using CName. If it says, verification fails then recheck that records are properly added in Digital Ocean or not. If yes, then wait for some time and then try verifying later.
- After successful verification of your domain, you will now have to create your custom email address. In my case, it was admin[at]techrrival.com.
- Now you can add users and also can create groups to manage multiple email addresses. But for now, we are going to skip that part because it’s quite easy.
- To receive email on these new custom email, you will have to add MX records to your DNS. Go to DNS Manager in Digital Ocean, select MX records and add these records.
@ mx.zoho.com 10
@ mx2.zoho.com 20 - Now you will be able to receive emails on your custom email addresses.


Setting up IMAP/POP/SMTP access
After completing the above steps, now you will be able to access your email account using the setting given below. You can use it with services like Gmail or any other 3rd party email service or client. Use Easy WP SMTP, one of the best plugins for WordPress to configure your WordPress to send mail using a custom email address. You can also use SSL and TLS encryption.
Dodging the SPAM Filters & Making the Mails Origin Authentic
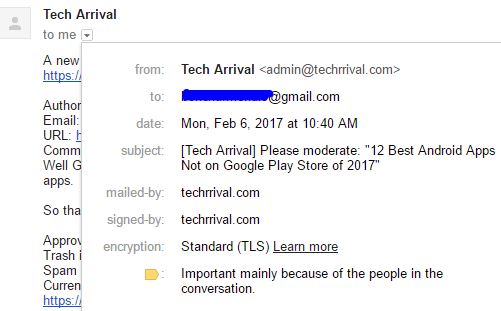
If you are a very keen user, you may have seen something like this on your Gmail account.

Even though your email will not land in SPAM, but the user will see a question mark when they receive mail from your custom email. This doesn’t look good. So now we are going to fix that by using SPF and DKIM records.
What is SPF and DKIM records?
Authentication is a way to prove an email isn’t forged. Adding these records means that your domain has verified to send this email on behalf of Zoho, WordPress or any other service.
Adding SPF Records
![]()
You can add SPF record by adding @ in the hostname and v=spf1 include:zoho.com ~all in value
You can verify this using several tools like http://www.kitterman.com/spf/validate.html
Adding DKIM Records
- Go to Zoho Mail control panel. Click mail administration, go to Email Authentication -> DKIM.
- Click edit and click add selector. You can add anything there, click on save.
- Now you will have to add the newly generated records in the DNS and complete the verification process.
- After successfully verifying the selectors, the next thing you need to do is to enable it for your domain. Go to DKIM in control panel and click the gray button next to your domain name. It will turn green, and that means you are now ready to roll.


After effects of adding SPF and DKIM records
Now the next time you send an email it will look like this:
Now it looks pretty dope right. I hope that you have liked this guide to setup custom email on DigitalOcean. If you find any difficulties, then do let me know in the comment section below.
Hi, really nice post, I was looking for help on this topic, and I found it here. Got information from this. Love your site. Thanks!
We are happy to serve you better. Glad to see you have got help from us.
Unfortunately Zoho is no longer offering a free IMAP service. The free plan is now webmail only.
Hurrah, that’s what I was searching for, what a stuff!