
Gaming is not all about your keyboard and mouse. To get an awesome experience out of the game, you will also need high standard screens and sound systems. Hardcore gamers know this. And that is why many of them choose HyperX Cloud Stinger headsets for their gaming purposes.
But recently many people have complained about their HyperX Cloud Stingers mic not working. This is a cause of distress for many gamers and hence a lot of them are looking for ways to fix it. Well, lucky for you we have written this article precisely for this matter. So let’s dive right in.
Contents
How To Fix HyperX Cloud Stinger Mic Not Working
We have tried and tested several methods to resolve this issue and found a total of 5 working solutions to fix HyperX Cloud Stinger mic not working problem. So, check and apply them one by one to solve HyperX cloud stinger not working issue.
Solution 1: Checking your connections
It is funny how the most complex problems have the simplest solutions. And the same case applies to this solution as well. Sometimes the only thing that might be causing the error will be some kind of loose connection or the microphone not being plugged in properly. So inspect your connections properly. There also might be instances where your headphone jack might be damaged. In this case, you will have no choice but to replace it.
But on the other hand, hanging microphone connections or even loose connections within the microphone can cause the error.
Solution 2: Enabling Audio Devices
Speaking of simple solutions, another instance when your headset might not be working is when your audio devices are not enabled. If you are dealing with this issue, then all you need to do is to go ahead and enable them.
Follow the steps below to do that:
- Click on the Windows icon on your screen to get to the Start Menu.
- Select the Settings icon.
- When the Settings windows open, choose the System option.
- Click on the Sound option from the left pane.
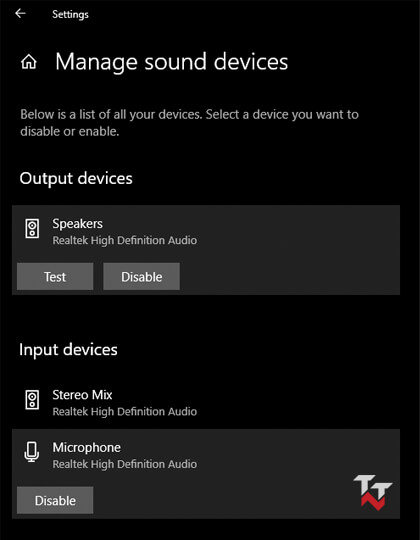
- Now, click on Manage sound devices.
- Make sure that your Mic and Speakers are enabled.
- If they aren’t enabled, Enable them. Also, check that they are not in mute or that they are not set at a very low volume.
Now check HyperX cloud stinger mic is working or not. If not then try other solutions given below.
Solution 3: Setting HyperX Cloud Stinger mic as the default device
The malfunction may be simply caused due to the fact that your HyperX Cloud Stinger was disabled. Even not setting it as your default device can cause it to not work properly. If that is the case, then all you need to do is to set it as your default device.
Here is how you do it.
- Type control panel in the Windows search bar and then hit Enter.
- When the Control Panel opens up, click on the View by drop-down menu. You will see it at the top right corner of the screen.
- Choose the Large icons from that menu.
- Find the Sound option and then click it.
- Switch to the Recording tab.
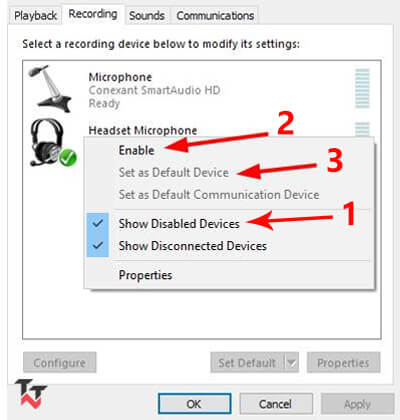
- Within the device list, right-click in some empty space.
- Choose the Show Disabled Devices option.
- Go near the Headset Microphone option and then right-click it.
- Select the Enable option.
- Right-click it yet again.
- Choose the Set as Default Device option.
When you see that HyperX Cloud Stinger not detected, you should try this solution. It will work in most cases.
Solution 4: Updating your headset driver
Name any error and it is guaranteed that one of its sources will have something to do with a driver. Sometimes, the error will be caused by a faulty driver. While outdated drivers might be behind the act at other times. When it comes to your mic on HyperX Cloud Stinger, updating your driver can sometimes do the trick. It is quite easy to do and is a quick fix.
Follow the steps below to update the drivers:
- Type device manager in the Windows search bar and press Enter.
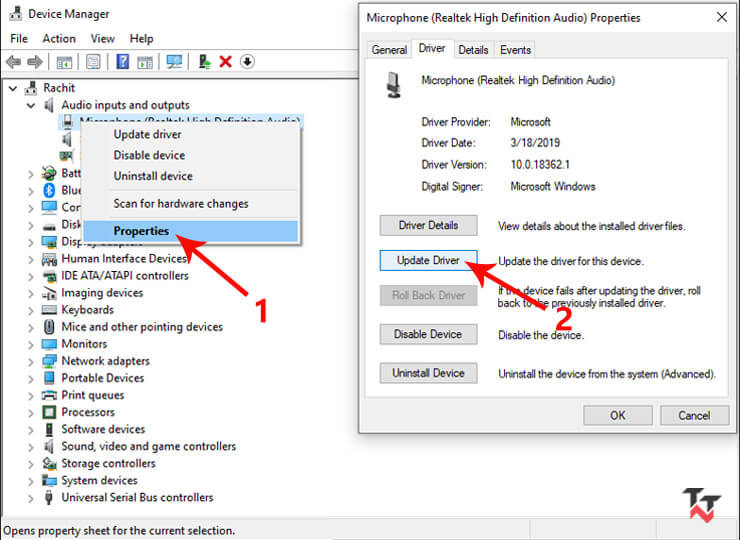
- Find and expand Audio inputs and outputs.
- Locate your headset from the list and right-click on it.
- Select the Properties option.
- Switch to the Driver tab and then choose the Update Driver option.
- Finally, choose the Search automatically for updated driver software option.
- You will most probably have to follow some on-screen instructions to install the new update. And it might take a while.
- Once you are done with the update, Restart your computer.
This quick trick can solve your HyperX Cloud Stinger mic not working in Windows 10.
Solution 5: Using the sound troubleshooter
Troubleshooting is one of the standard procedures we apply for any error encounter. It can also resolve issues dealing with hardware and hence it is worth a shot.
Your headsets might not be working properly even due to mis-correction in the sound configurations. But you can deal with this issue quite promptly with the help of the sound troubleshooter.
Here is how you do it:
- Go to the Start menu and then click on the Gear icon to open Settings.
- You can also use the Windows key + I key combination on your keyboard to open Settings.
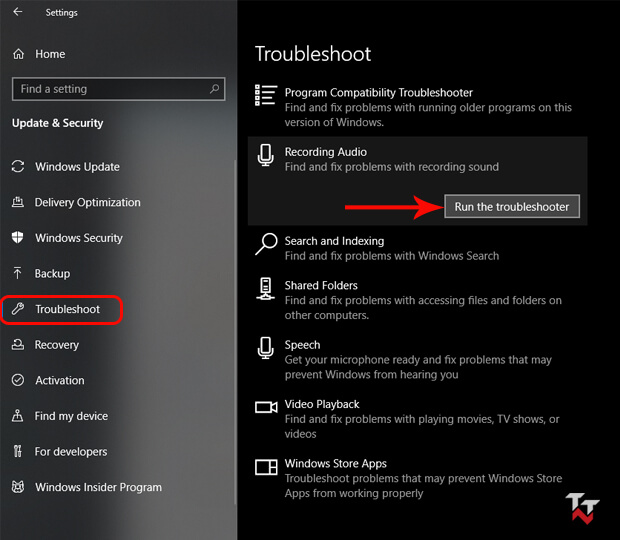
- Among the various options on the screen, choose the Update & Security option.
- Select the Troubleshoot option from the left pane.
- Click on the Recording Audio section and then choose the Run the troubleshooter under it.
- Follow the on-screen instructions and then wait for the task to complete.
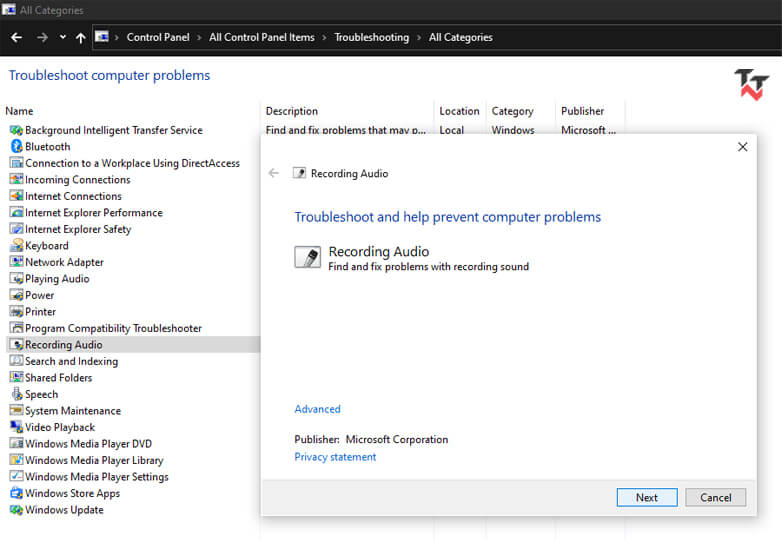
Many users have had trouble with the above process. So, if you are having a problem running a troubleshooter from settings, you can run one with the help of the control panel.
It is quite simple and these are the steps you need to follow:
- Press the Windows key + R key on your keyboard to open the Run dialogue box.
- Type in control in the space provided and then choose the OK option or hit Enter.
- You can also use the Windows search bar to look for the Control Panel.
- Once the Control Panel opens, get to the View by the option on the top right corner of the screen.
- Choose the Large icons option.
- Among the various options you see, select the Troubleshooting option.
- When the next window opens, choose the View all option from the left pane.
- You will see a large list of items. Navigate your way to Recording Audio and then click on it.
- Now, the troubleshooting window will open. Choose the Next option to proceed with the process.
- Windows will show you several on-screen instructions. Follow them to finish the troubleshooting process.
This method always works best because Windows automatically detects the problem and also resolves it. So, now your HyperX Cloud Stinger mic should work properly.
Conclusion
Sound clarity is an important part of gaming and peeps using this particular headset are facing some issues. The article above informs you about all the solutions to this issue. Hence now you can play non-stop, right after you fix HyperX cloud stinger microphone not working problem.